When storms sweep through the Southeast, facility managers’ minds usually jump to debris damage, drainage problems, and similar headaches. However, an equally crucial (if, ironically, less flashy) aspect of a healthy commercial building is drip edge flashing.
This small piece of metal lining your roof’s edge has a massive impact on your property’s longevity, ensuring that water flows away from, rather than into, your roofing system. And in the Southeast, where high humidity and hurricane winds cause nightmares for property owners annually, drip edge flashing is particularly important for warding off water damage. In this article, we’ll cover what drip edge flashing is and why it matters, equipping you to make informed decisions about drip edge installation and repairs—and, as a consequence, saving you money in the long run.
Table of Contents
Quick Answer
Drip edge flashing is an L-shaped piece of aluminum, galvanized steel, copper, or vinyl that lines the perimeter of your roof, directing water away from your roof assembly. It also helps to resist wind uplift and is required by most local building codes in the U.S. In the Southeast, where severe weather like hurricanes is common, drip edges are crucial to your roof’s durability and longevity.
Looking for Commercial Flashing Services?
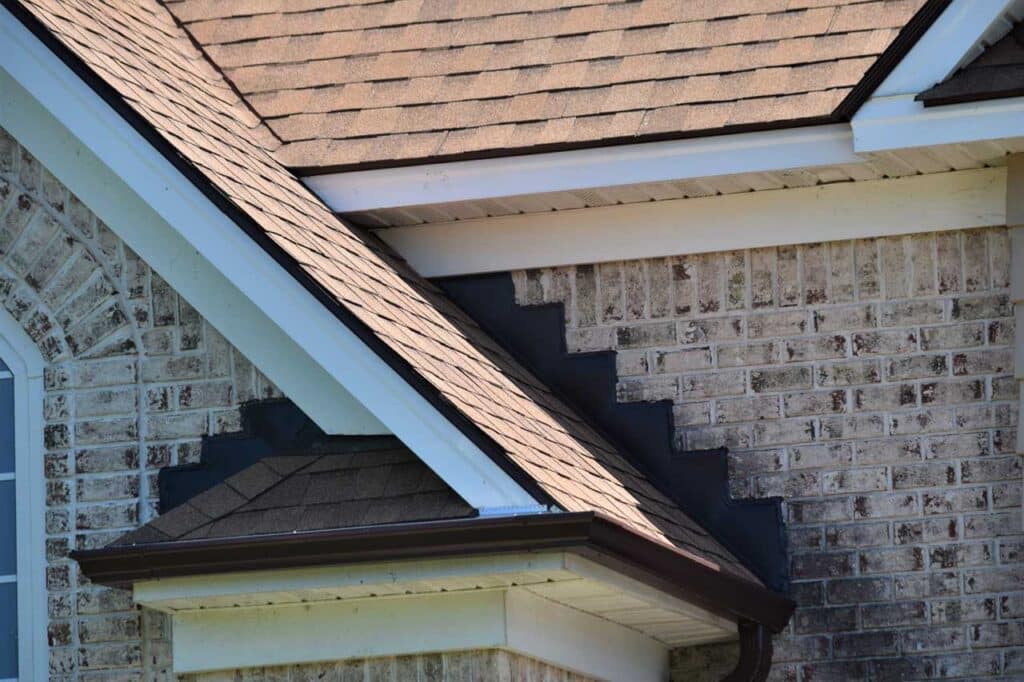
What Is Drip Edge Flashing?
Drip edge flashing is the L-shaped piece of metal or vinyl that runs along the perimeter of a roof. While used on all types of roofs, this system is most common on steep-slope roofs, running both parallel to your shingles (or along the eave) and along your roof’s A-frames (or along the rake). However, these components also serve important roles in many flat roofs, meaning that whichever type of roof your property sports, you’ll benefit from understanding drip edge flashing inside and out.
The purpose of drip edges is to create a sealed barrier preventing water infiltration beneath your shingles or roof membrane. Plus, they help your roof’s edges resist wind uplift, providing enhanced structural integrity to your broader roof assembly.
That’s not to mention that drip edge flashing is required under most local building codes in the U.S., in line with the 2021 International Residential Code (IRC). So, without drip edges, you’re vulnerable to both costly repairs and legal problems, especially if you live in storm-prone areas or localities with strict building codes.
Why Drip Edge Flashings Are Essential in the Southeast
The Southeast’s unique, hurricane-prone climate makes drip edge flashing non-negotiable, especially in coastal areas. For instance, heavy downpours can push water toward fascia (the vertical band running below a roof’s edge for structural support), risking leaks and water damage. Also, humid air can accelerate rot in your roof’s decking structure, and hurricane-force winds can cause severe wind uplift that can rip off roof materials. So, without drip edge roof flashing, wind and water will find ways to infiltrate your commercial building.
Additionally, unlike drier regions of the U.S., some Southeastern states enforce stricter building codes when it comes to drip edges. For example, Florida’s Building Code requires drip edges along the perimeter of pretty much all steep-slope roofs. Of course, this ensures that your property can withstand storm season, but it also means you need to keep up with your roof assembly to make sure your drip edges are functioning properly.
Drip Edge vs. Gravel Stop: What’s the Difference?
Facility managers sometimes confuse drip edge flashing with gravel stops in roofing. Both involve perimeter metal, but their functions differ. Gravel stops are barriers usually used on built-up roofs (BUR) to keep gravel and other ballasting materials in place, ensuring that the roof membrane doesn’t move. To compare gravel stops with drip edges, see the table below.
Feature | Drip Edge | Gravel Stop |
Primary Function | Directs water away from fascia and decking | Keeps gravel or ballast from washing off roof |
Typical Use | Shingle and low-slope roofs | Built-up roofs with loose surfacing |
Appearance | Sloped edge kicking water outward | Vertical face with a small “kick” at the top |
Risk if Misused | Water intrusion and fascia rot | Washed-away surfacing and UV damage |
Drip Edge Flashing Materials
Not all roofing materials are created equal (or, crucially, priced equal). Naturally, this applies just as much to drip edge flashing materials. Below, we go over some common types of drip edges and whether they’re right for you.
Aluminum
Aluminum is a durable, lightweight metal known for resisting rust. This material tends to be one of the most common and affordable options on the market, costing about $0.30-$1.00 per linear foot according to Angi. However, it’s not as long-lasting as other materials like steel and may not hold up well in coastal areas with frequent severe weather.
One more important point is that aluminum can be painted in a variety of colors to match your property’s unique aesthetic. Plus, it can also come with an enamel finish for added protection, providing both durability and improved aesthetics.
Galvanized Steel
Galvanized steel is best for projects requiring extra strength, since it boasts a stronger structure and a zinc finish that allows it to better withstand corrosion. However, it costs more than aluminum at $0.50-$1.20 per linear foot. A few further notes:
- Since steel is vulnerable to corrosion and drip edges are frequently exposed to rainwater, steel must be galvanized if used for drip edge flashing; otherwise, it will rust rapidly.
- 24-gauge steel or thicker is best to in order to prevent wind uplift during storms (remember, the higher a metal’s gauge number, the thinner it is).
Copper
The last metal option is the most expensive, costing around $3.50-$7.50 per square foot. Copper is mainly sought for its aesthetic appeal, with its eventual patina providing a stunning look no other metal can match. However, it’s also remarkably durable, lasting between 50-100 years and boasting unparalleled corrosion resistance. Some notes:
- Copper drip edges should be a minimum of 0.7 millimeters for maximum effectiveness.
- With the high price point, copper’s aesthetic and functional value best serves on properties that receive customers frequently, such as restaurants and law firms (people like pretty things, after all), as well as those that receive frequent severe weather, such as businesses in coastal areas.
Vinyl (and Other Non-Metals)
As flashing, vinyl shares a similar profile to aluminum, requiring little maintenance and boasting both a greater variety of color options and a lower price than most alternatives. However, it tends to lack the same longevity as most metals and is therefore best suited for flashing above windows and doors, where it can last between 20-30 years.
Other forms of non-metal drip edges include plastic and fiberglass, and what’s true of vinyl largely applies to them as well. Non-metals don’t make particularly good drip edges and should only be used on budget projects and in areas with little severe wind and weather.
Materials: What You Need to Consider
Your main considerations when deciding on which material is right for you should be your budget and climate. Below is a detailed list of the factors you should account for when making your decision.
Material | Pros | Cons | Best Use Cases |
Aluminum | Rust-resistant, easy to cut/shape, cost-effective | Can dent or bend more easily, less durable in hurricane zones | Inland commercial roofs where budget is important; standard protection in non-coastal Southeastern areas |
Galvanized Steel | Stronger than aluminum, resists uplift, good balance of strength and cost | Zinc coating can wear down over time; may rust in salt-heavy coastal air | Warehouses, retail centers, and office buildings across the Southeast that need long-lasting protection without premium costs |
Copper | Extremely durable, resists corrosion, long service life, upscale aesthetic | Expensive upfront; requires skilled installation | High-end commercial buildings, historic restorations, and customer-centric properties in coastal areas where longevity and appearance matter |
Vinyl | Affordable, lightweight, resistant to rust or rot | Brittle in extreme heat/cold, prone to cracking, limited lifespan | Temporary or budget-conscious applications; not recommended for most commercial roofs in the Southeastern U.S. |
Best Practices for Installing Drip Edge of Roof
We recommend that you use a professional contractor (like, ahem, Baker Roofing) when roofing drip edge flashing, for reasons of both safety and quality. However, if you’re determined to go with a DIY installation, the details matter, as even small mistakes can lead to water infiltrating your roof and causing leaks. A proper drip edge install includes:
- Lock Strip: For roofs with more than three inches of thickness, a lock strip, one gauge heavier than the face metal, prevents the flashing from lifting in high winds.
- Correct Fastener Spacing: Fasten every four inches on center, staggering nails or screws. This prevents oil canning and strengthens the edge against uplift.
- Overlaps: Overlap sections by two inches or more to stop capillary water intrusion.
- Material Choice: In hurricane-prone areas, heavier-gauge steel roof drip edge outperforms lightweight aluminum.
- Membrane compatibility: On commercial flat roofs, drip edge flashing must integrate tightly with TPO, PVC, or EPDM membranes. Using the wrong adhesive, for example, can lead to seam failure.
This is also useful information if you do choose to work with a contractor; throughout the project, you should check with them and ask questions about the work they’re doing, ensuring they’ve aligned themselves with these best practices. That way, you can be sure the quality of their work is up to snuff!
Retrofitting: How to Install Drip Edge Flashing on an Existing Roof
Many facility managers ask us how to install drip edge flashing on existing roofs. To do so, you’ll need to carefully remove any previous drip edge flashing. You can do this by:
- Lifting up the perimeter roofing material above your old drip edge and locating the nails holding the flashing in place;
- Using a pry bar and hammer to remove these nails, then carefully slipping the old drip edge out;
- Sliding the new flashing under the roofing material, and;
- Installing this new drip edge in place, aligning with the best practices outlined in the last section.
However, a drip edge flashing install job on an existing roof can be risky, since it requires raising roof material to access the drip edge. Because of that, it’s best for a professional contractor to handle this process, and even then, a full reroof may be best in some cases to fully integrate the new flashing within your roofing system.
Drip Edge and Low Slope Commercial Roofs
While many people associate drip edge with shingle systems, it plays a critical role in low-slope commercial roofs too. Here, drip edge flashing directs water into drains and scuppers instead of allowing it to cascade down walls. When paired with coping caps, it also protects parapet walls (the protective walls on the edge of the roof).
In high-wind zones, a combined system, where waterproof membranes are fully adhered and reinforced with secure drip edge flashing, offers the best resistance to blow-offs. In Southeastern storm conditions, this detail alone can prevent a costly reroof further down the line.
Maintaining Drip Edge Flashings
Unlike some roof components, drip edge has no moving parts, but it still requires regular inspection. Facility managers should:
- Look for corrosion or rust on galvanized drip edge, since this is a sign of major wear-and-tear.
- Check that fasteners are intact and not backing out, as this can compromise structural integrity.
- Inspect for separation between membranes and the drip edge flashing roof system, which can allow water to infiltrate your roof assembly.
- Verify that overlaps are still sealed and aligned; otherwise, your drip edges are more vulnerable to water intrusion.
Routine inspections, particularly before and after hurricane season, keep roof drip edge flashing in top shape.
Frequently Asked Questions (FAQs)
Drip edge flashing is an L-shaped strip of metal or vinyl installed along the edge of a roof to direct water away from fascia and decking and prevent wind uplift. It also meets building codes in most localities in the U.S.
To retrofit, carefully lift the edge shingles or roofing materials, slide the metal drip edge beneath (at eaves) or over (at rakes), and nail securely every 12–16 inches. Overlap pieces by at least an inch. Seal joints if required. For hurricane-prone Southeastern areas, professional installation is recommended.
A gravel stop is perimeter metal used on built-up roofs to hold back loose gravel or ballast, keeping the membrane in place and protecting the roof assembly as a consequence. It looks similar to a drip edge but functions differently.
No. While a gravel stop drip edge resembles flashing, it is not designed to direct water away from the roof. Always use drip edge flashing for water management.
Inland properties often use aluminum drip edge. For coastal or hurricane-exposed properties, copper or galvanized steel roof drip edge provides the best durability.
Final Thoughts
In the Southeast, high humidity and frequent severe weather makes the quality of your roof’s flashing a potentially very costly issue, with rain and wind uplift causing leaks and structural problems if your drip edge is damaged or improperly installed. Luckily, now that you’re a drip edge aficionado, you can be sure to regularly check your roof’s perimeter to make sure your flashing is in top-notch shape.
Are You Looking for a Commercial Roof Flashing Contractor?
As a business owner or facilities manager, your priority is running your operation, not worrying about roof leaks or wind damage. That’s where Baker Roofing Company comes in. With more than 110 years of experience serving the Southeast, we deliver commercial roofing solutions built to last, aligned with the Baker motto of “Always Good Work.”
Partner with us for dependable service and long-term peace of mind. Request your free quote today, and let’s protect your property with a roof that performs for decades.
More Information on Drainage Systems